EATSIES
  • About
  • Class Calendar
  • Photos
  • Sample Classes
  • Upcoming Classes
  • Reviews and Comments
  • Contact
  • Blog
  • Online Kid's Cooking
EATSIES

Eat Your Veggies

9/14/2020

1 Comment

 
Hello everyone!

I can't believe it's already mid-September and we're still tethered to our homes. I hope you’re surviving with your health and sanity intact!

For a bit of positive news on the Eatsies front, I’m slowly beginning to teach classes again. I'll be taking small, masked, and socially distanced groups in my kitchen on a case-by-case basis, and I'll continue to teach larger groups via Zoom. Thank you, technology!! Please contact me for more info if you're interested in adding a class or two to your quarantine routine. :) 

Until then, I’m continuing my recipe-themed newsletters this week by bringing you one of my absolute favorite staples: my Basic Roasted Veggies. This recipe is simple, incredibly delicious, nutritious, can be used in so many different ways - and most of all, for you parents out there, it’s a terrific way to get your kids to eat their vegetables. Cooked this way, they get all caramel-y (is that a word?) and sweet, almost like candy. I usually keep a bowl in the fridge just for snacking! As usual, I've included a few tips throughout the recipe to make it come out just right, so read on for some variations. And let me know how you made it your own!!
 
Basic Roasted Veggies  
  • Approximately 6 cups assorted vegetables (broccoli, carrots, sweet potato, cauliflower, brussels sprouts, onions, beets, summer squash, bell peppers, etc...)
  • 3 large cloves garlic, peeled and minced, or 1 teaspoon garlic powder (optional)
  • 2 tablespoons olive oil
  • 1 tablespoon kosher salt
  • 1 teaspoon pepper
 
Preheat oven to 450°. 

Wash all vegetables, and lightly pat dry with a paper towel. If your veggies are very wet, they will steam instead of roasting, and you won’t get that delicious crispy caramelization.

Cut veggies into bite-size pieces.  Place veggies and minced garlic on a large, rimmed baking tray.  Sprinkle with 2 tablespoons olive oil, salt, and pepper.  Using your hands, toss well to get all veggies evenly coated.  Spread out in a single layer on 2 trays, being careful not to crowd veggies (they’ll cook more evenly if the heat can get all around them!).

Roast for 20 minutes, or until veggies are tender and beginning to brown on the edges. 

Optional: after veggies are roasted, but while they're still warm, you can toss them with 1-2 tablespoons lemon juice or balsamic vinegar.

Also, feel free to toss in a teaspoon of your favorite herbs or spices, such as chili powder, oregano, dried basil, or really whatever sounds tasty to you. The possibilities are endless.

Note: roasted veggies are delicious tossed into salads or pasta, or pureed with broth and made into a soup. I’ve even been known to eat them in burritos.

Wishing you all the best! Stay safe and sane, until next time,
​
Teri
1 Comment

Watermelon on the Brain

8/17/2020

1 Comment

 
​Hello all, and happy August!
 
Is it just me, or are we all still waiting for summer to arrive? 2020 has been a year of endless confusion and frustration – so I guess it only stands to reason that now even the seasons aren’t cooperating. Hopefully you’ve all had the chance to enjoy a meal outside, though, whether on a patio, in your yard, or… sitting in your driveway?  No judgment here! Anything to escape the house. J
 
Today’s recipe is perfect for the next time you head outside, whatever the weather: an easy, refreshing, and wonderfully flavorful Watermelon Salad.  You can make it a few hours ahead of time and as with the rest of my recipes, you can tailor it to your personal taste.  It’s terrific with Cantaloupe or Honeydew, and you can add a bit of pepper flakes to amp up the spice factor and add some excitement to your day J
 
Watermelon and Feta Salad
 
6 cups watermelon cubes, from about 1/4 of a large watermelon
1 tablespoon seasoned rice vinegar
3 ounces feta cheese, drained and crumbled
1 loosely packed cup fresh mint leaves
Freshly ground black pepper
Flaky sea salt or Kosher salt
 
Pour off any juice that has gathered around the watermelon. Toss gently with the rice vinegar. Toss with the feta cheese crumbles, just until the watermelon begins to look lightly coated.
 
Chop the mint leaves very, very finely, into tiny ribbons. Toss with the watermelon and spread in a serving bowl. Garnish generously with black pepper. Taste. If desired, add a sprinkle of flaky sea salt. Serve immediately.
 
I hope you’re well, and I look forward to teaching you again someday soon!
 
Teri
1 Comment

Do you Salsa?

7/20/2020

0 Comments

 
Hello fellow quarantiners!

I miss you all, and I hope you’re doing well. While more time has passed and it seems like we won’t be returning to normal any time soon, it is still summer, and anywhere you're quarantined is a great place for a cold drink, a bowl of chips, and some fresh homemade salsa. Eatsies to the rescue! For this week's recipe, I wanted to pass along my absolute favorite, super-easy Salsa Verde.  This recipe is (almost) simple enough to make with your eyes closed, and it’s so versatile, you’ll want to keep a batch in your fridge all summer!  Besides serving it with chips, it’s terrific on tacos, as a topping for chicken or pork chops, or as the sauce for some absolutely delicious Enchiladas Verdes.  Even better news: you have the ability to make this salsa as spicy or as mild as you choose just by varying the type and/or amount of peppers you use.  So what are you waiting for?  Let’s get cookin'! J
 
Salsa Verde
8 tomatillos (about 1 lb.), husked, stemmed and rinsed
2 large onions, peeled and cut into quarters
2 large poblano peppers
Optional, for extra heat: 1 small hot pepper (jalapenos and serranos work great here, or even a habanero if you can't get enough heat!)
2 large cloves garlic, peeled
1 large handful cilantro, stems and all, well rinsed
1 teaspoon cumin
1 teaspoon salt
1 tablespoon lime juice (about ½ of a medium lime)
 
  • Preheat oven to 430°.
  • Place tomatillos, onions, peppers and garlic on a large rimmed baking sheet.  Roast in oven for 20 minutes, or until beginning to brown and tomatillos are soft.
  • Remove stems and any loose skin from peppers, and place them, along with the tomatillos, onions, garlic and any juice from baking sheet into a blender or food processor.
  • Add remaining ingredients and blend to desired consistency.  Some people prefer this very smooth and some prefer a chunkier texture. 
  • Adjust seasoning with more salt or lime juice to taste.
  • Eat right away, or store (covered) in the refrigerator for up to 1 week.
Since there are so many ways to use this salsa, I’d love to hear your ideas.  Email me and let me know how you use it - bonus points if you send a picture I can feature on the Eatsies Instagram! 

As always, I hope you’re staying sane and healthy.  I look forward to teaching again one day soon!

All my best,

Teri

0 Comments

It's tool time!

7/5/2020

0 Comments

 
Hello friends, 
 
How’s the quarantine treating you? I was getting so excited, thinking I’d be able to start teaching again soon, but after California’s recent numbers, my optimism is beginning to wane. :( In the meantime, though, here’s another little newsletter with (hopefully) some helpful tidbits that might make your cooking adventures a bit more relaxing.  And if you’ve missed any of my quarantine letters, please take a look at my website, where I just got around to posting them!  And (fingers crossed…) be on the lookout for my email announcing my return to teaching! As much as we’d all like to forget quarantine at this point, I’m putting together a class sharing my favorite dishes from the past few months that I think you’ll love.  My biggest goal during this time was to come up with a recipe for the ultimate veggie burger... and I THINK I’VE DONE IT!!
 
Without further ado, here are your tips for today, in the form of a few kitchen tools that every cook should own. Now, I’m not normally a “gadget” person.  My kitchen is already crowded, so for me to really like a gadget, it has to be: 
  1.     A multi tasker 
  2.     Small 
  3.     Something that gets a job done easily and saves me time
 
And the winners are...
 
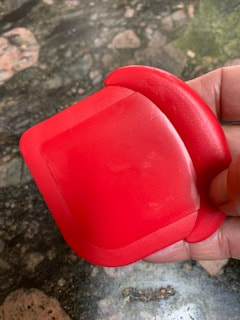
Plastic bowl/pan/counter scraper:  These little thingies can be found for under a dollar at your nearest hardware or home store and they are truly a lifesaver.  Because they’re plastic, they won’t scratch the surface of whatever you need to clean and they really do the job.  Rock hard, burnt on spills on your stove, counters or pans will come off easily.  I use these on my granite counters and All Clad pans with no problems at all.  Keep one by your sink.  
 
 
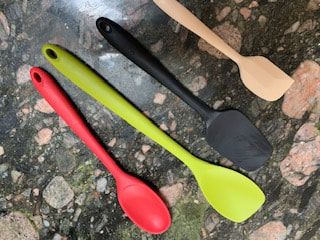
​Silicone spoons, spatulas and “spoonulas”:  these are the BEST!  They won’t melt on the stove, and they’re great for stirring, mixing, and scraping that last drop from your bowls.  And the little ones are perfect for getting that last bite of peanut butter out of the jar. :)  My fave part of these is that they’re made in one piece. Sound unimportant?  Then you’ve never had the handle of a spatula come off and been forced to take a look at the gunk that gets trapped inside!  Yuuuuck! You can find these everywhere, especially TJMaxx or Homegoods.
 
 
​Mini Citrus Juicer:  This little baby will get you every last drop of juice and is really easy to use and to wash.  And it has measurements on the side so you know just how much juice you’ve squeezed.  I’ve found them at Homegoods for about $3.  At that price, buy 2!


And lastly, if you’ve taken one of my classes, you may have met my favorite Can Opener.  I don’t even know the name of this style (there are several different companies that make these), but the key is that they roll the top edges of the can so that you don’t end up with any sharp edges.  Also, the can opener never actually comes in contact with the can’s contents, so you don’t end up with rusty blades or icky black buildup! Be sure to look for the kind described as “safe cut” or “smooth edge”.
 
 
Finally, it wouldn’t be an Eatsies letter without including a quick little recipe that’s sure to make your mouth happy! Today’s is for the summer cocktail drinkers, lemonade stand-ers, and fruit lovers everywhere: Simple Syrup!!  Sure, you can buy this everywhere, but it is definitely one of those recipes that you should be making from scratch.  It is soooo easy to make, costs a fraction of what it would cost pre-made, and will last in your fridge for months!  And you can use it in so many ways: as a sweetener for lemonade or your favorite “adult” drinks; poured over cut fruit to sweeten a fruit salad; or even added to pureed fruit, then frozen to make a sorbet.  And to make it extra special, see notes below for different ways to flavor it!  
 
Homemade Simple Syrup
 
1 Cup white granulated sugar
1 Cup water
 
Place both ingredients in a medium pot over high heat, and stir to dissolve sugar.  Bring to a boil, then turn the heat down to low.  Let contents simmer for about 20 minutes, or until it becomes slightly thick, like a syrup.  Remove from stove and let cool (it will thicken a bit more as it cools).  Can be stored, covered, in the fridge for months.  Or put some in a pretty bottle to give as a gift!
 
Note: For a delicious flavored syrup, add your favorite herbs, spices, or fruit (like a handful of fresh mint or basil, a small cinnamon stick, a vanilla bean, or the peel of a lemon, orange, or lime) after bringing the syrup to a boil.  Let simmer, then strain out before using or storing. 
 
Happy cooking, happy eating, and I do hope to see you soon!
 
Stay healthy, 

Teri
0 Comments

Just don't call it a Covid Slaw

6/4/2020

2 Comments

 
​Hello out there!
It's been 12 weeks since quarantine began (wait, can that be right???), and though it looks like we still have a ways to go, I cannot wait to start teaching again! Can you say “stir crazy”? In the meantime, I wanted to pass along a family favorite recipe to help you get through the coming days of summer. It’s light and nutritious, and as with my other recipes, it can (and should!) be personalized based on your preferences. :) 
 
Mexican Style Coleslaw
Slaw:
½ large green cabbage, shredded
½ large purple cabbage, shredded
2 large carrots, peeled (if desired) and shredded
¼ cup cilantro, chopped (thick stems removed)
½ cup chives or green onions, chopped (use both white and green parts)
*See below for optional ingredients and suggestions.
Dressing:
¼ cup oil of your choice (olive, vegetable, canola, peanut, etc.)
¼ cup seasoned rice vinegar
2 tablespoons lemon or lime juice
1 teaspoon salt
1 teaspoon chili powder
1 teaspoon cumin
½ teaspoon black pepper
Directions:
Combine all slaw ingredients (veggies and herbs) in a large serving bowl.
Next, combine dressing ingredients and whisk well. Pour over veggies and toss to combine.  
Let sit at room temperature for 20 minutes to allow flavors to meld. Toss once more before serving. 
This salad will last several days in the fridge, and tastes even better after it “marinates”!
*Optional ingredients: shredded bell peppers, jicama, bok choy, napa cabbage, Brussels sprouts, broccoli...
Plus, you can even tweak the dressing!  Are you a lemon lover? Skip the rice vinegar and add more lemon juice. Like it spicy? Add some finely minced canned Chipotle pepper, some dried hot chili powder, or even some Tapatio or Tabasco hot sauce!  As an added bonus, this dressing is also great on diced fruit, such as mango, pineapple and papaya. 
 
However you make this salad, I hope you enjoy it - and stay healthy and sane. And when this is all over, think of EATSIES for a great way to reconnect with friends over a delicious meal and a chance to learn some fun new cooking skills. I’ll still be teaching classes for kids (ages 10+) too, once things open back up, so feel free to send them my way as well!
Teri
2 Comments

Frozen in time

5/12/2020

1 Comment

 
​Hello there,
I hope you’re all staying healthy and sane. This week, instead of a recipe, I thought it might be nice to send you some of my favorite cooking tips - specifically, tips on freezing all of the delicious food you're making during quarantine, as well as the critical ingredients that you're hoarding in case the grocery stores never re-stock (looking at you, yeast and flour!!). Those who know me well know that I'm the queen of the freezer, and I have not one but three freezers around my house. While that's way more extreme than most, I wanted to pass along some tricks that will help you use even a tiny freezer in ways you never expected.
Before I list my tips, let me begin by saying that in all cases, the biggest negative in freezing is Freezer Burn. But never fear, it's easily avoided! The key here is to get rid of all excess air. It’s the moisture in the air that results in the burn, so before you seal up an item to freeze (and I highly recommend that you freeze most items in a plastic bag, rather than a solid container), squeeze out ALL the air! Of course, it’s a bit harder to do that in a solid container, so if you're using one, I’d recommend putting a layer of plastic wrap directly over whatever you’re freezing--touching the surface of the food itself--to protect it from any air in said container. Got that?
And if you’re freezing liquids, soft items, or ground meats, once you’ve sealed them up, spread the contents into a flat layer within the bag.  This will make it much easier to stack in your freezer, and it will thaw much faster once you’re ready to eat it!
Without further ado, here are some items you may not know are freezer candidates:
  1. My personal fave: Popcorn!  It’s my go-to comfort food and I always pop way too much. But who likes leftover, stale popcorn? Just throw it into a bag, freeze it, and voila! You can eat it right out of the freezer!  Because popcorn is mostly air, it won’t actually freeze solid and it’ll stay fresh for weeks - plus, it won't even be that cold when it comes out of the freezer (weird but true!). 
 
  1. Yeast: this little goodie will last almost indefinitely if you keep it cold and dry.
 
  1. Leftover Bread to make breadcrumbs: throw those leftover slices into a freezer bag.  When needed, tear the frozen slices into smaller pieces, toss ‘em into your blender or food processor, and boom, instant breadcrumbs! Even better: whatever crumbs you don’t use can be tossed right back into the freezer. 
 
  1. Tomato Paste: Why is it that most recipes call for a tablespoon or two, but the can always contains sooo much more? This is where those cheap, plastic ice cube trays come in really handy. Scoop the leftover paste into the tray (each cube holds about 2 tablespoons), freeze it, then pop the cubes into a bag for storage.  When needed, just toss a cube into whatever you’re making… they thaw really fast.
 
  1. Pesto: Time to grab the ice cube tray again. The addition of a frozen pesto cube adds extra flavor to soups or sauces, or you can thaw a few at a time and use on pasta or a pizza!
 
  1. Lemon (or Lime) Juice:  Don’t put the ice cube tray away yet!  It’s lemon season now, so juice a few, freeze the juice in the tray, then pop the frozen cubes into a bag to store.  You’ll have lemon juice at the ready for the rest of the year.
 
  1. Fresh Herbs: Basil, Thyme, Oregano… just about any herb will do.  Chop them up a bit, drop them into ice cube trays (yup, the tray is back), then cover them with olive oil.  Once frozen, you’ll have delicious herby cubes to drop into your pasta sauce or anything else that could use a little extra flavor.
 
  1. Nuts: I store all my (shelled) nuts in the freezer.  Kept cold and dry, they’ll last so much longer than in your pantry.
 
  1. Grains, such as flour, oats, rice: The freezer definitely keeps them fresher.  And…(I can’t swear to the science of this, but it really does seem to work) freezing for 48 hours is said to kill those pesky moths that just love to create havoc in your pantry.
 
  1. Broth:  Only used half the can?  Pour the rest into (you guessed it) ICE CUBE TRAYS! 
 
Bonus #11: Milk!  Are you leaving on vacation (I promise, that time will come again one day...) but still have ½ gallon of milk in the fridge? Don’t pour it out! Put the whole container in the freezer. Just make sure you leave enough space in the container for the milk to expand upon freezing.  When you return home, pop the container into the fridge to thaw.  Yes, this is completely safe and doesn’t change the flavor at all.
That’s it for now. Hope you found these helpful. And when life returns to some normalcy, please don’t hesitate to join me for a real, live and in person cooking class at EATSIES! J
Teri
1 Comment

No soup for you???

5/1/2020

0 Comments

 
​Hello there everyone,
According to my calendar, we’re in week 7 (!!) of quarantine. I don’t know about you, but I could really use some comfort right now...I miss my friends, my students (OK, same thing!), and my freedom. Fortunately, my family and I are healthy, so I can't complain too much - instead, I thought I'd channel my energy into sending a little comfort your way! This week's recipe is one of my favorites: a simple, healthy, and deeply soothing Roasted Tomato Soup. It's similar to the version you can buy at Trader Joe’s, but without any need for a face mask or waiting in a long line. :) 
Enjoy this, and remember, as with most of my other recipes, don’t get tied down to the ingredient list… substitutions are welcomed. I've noted some potential edits at the bottom of the recipe, but anything that sounds good to you can (and probably will!) make it even better. Make it your own!
 
Roasted Tomato Soup
  • 3-4 pounds Roma/Plum tomatoes (I prefer this type because they’re more “meaty” and less watery.  But if you can’t find them, use what you have!)
  • 4 cloves peeled garlic (more or less, to taste)
  • 1 large onion (red, white or yellow), peeled and cut into eighths (again, use whatever type you have…it will still taste great!)
  • 1 ½ teaspoon salt
  • ½ teaspoon pepper
  • 3 Tablespoons olive oil
  • Optional: 2 Tablespoons chopped fresh basil, oregano or thyme
  • 1-3 cups chicken or vegetable broth or milk* 
  • Optional: 1 teaspoon balsamic or red wine vinegar
Preheat oven to 425°.
Cut tomatoes into quarters and place on a rimmed baking sheet, along with garlic, onion, salt, pepper and olive oil. Toss ingredients well and spread out into one even layer. Place in oven and roast for 25 minutes, or until veggies are soft and beginning to brown.
Once veggies are roasted, place the contents of the baking sheet into a blender or food processor, along with any juices that have accumulated in the pan, and the chopped herbs, if using.  Process on low or “pulse” until fairly smooth.  Add broth or milk, 1 cup at a time, and continue blending until you reach your desired consistency.  Add vinegar (if using) at this point.
Taste throughout the blending process to adjust seasoning, adding more salt, pepper, or any other spices as desired.  Can be served hot or cold, and is great with a dollop of yogurt, crème fraiche, or sour cream on top!
 *I've left this intentionally broad so you don't need to run to the store - just use whatever you have available. Milk (or even heavy cream, if that's what's in your fridge) will make for a mellower, creamy soup, where broth will add saltiness and savory flavors. In terms of the amount of liquid to use, just add 1/2 cup at a time until it's as thin or thick as you like it. With less liquid, this soup can be a delicious dip (maybe with veggies or hot crusty bread) or even a pasta sauce. 
 
With love and healthy wishes,
Teri
0 Comments

Cooking while masked

4/21/2020

4 Comments

 
​Hello again!
Hope you’re all hanging in there and staying sane and healthy. I'm so grateful for all of the responses I received to the email/recipe I sent you last week--so much so that I’ve decided to share another recipe today. This one is delicious while still being easy to make, extremely nutritious, gluten-free, and vegetarian (or vegan, if you so choose!). Plus, just like last week's, this recipe just begs for you to personalize it. Substitutions are welcome, so make it yours! In fact, this is a great way to make use of what you already have in your refrigerator and avoid a trip to the market!
And finally, in case you need a little inspiration for adding lentils to your regular diet, check out this website, which shows you that lentils have the lowest carbon footprint of just about any food out there. So if you’re hoping to save the planet (while still eating well!), lentils are the way to go. J
 
Marinated Lentil Salad
Lemon Garlic Dressing
¼ cup lemon juice (about 1 medium lemon)
¼  cup olive oil 
2 cloves garlic (about 1 tablespoon), minced (or 1 teaspoon dried garlic)
1/2 Tablespoon dried oregano (or 1 Tablespoon fresh, chopped)
1 teaspoon salt 
½ teaspoon black pepper
Note: this dressing is also delicious on most other salads!
 
Salad
1 cup dry brown lentils (you can also substitute a can of your favorite beans)
1/2 bunch parsley or mint, chopped (about ½ cup)
2 cups chopped tomatoes  
1/4 cup diced red, yellow, or green onion 
½ small cucumber, peeled (if desired) and diced
2 oz feta cheese, crumbled (omit if vegan)
Optional: ¼ cup chopped black olives, 1 shredded or diced carrot, 1 cup shredded cabbage, and/or 1 cup chopped red bell pepper or any other veggies you find in your fridge!
 
Bring 3 cups of water to boil in a pot, add the lentils, then continue to boil for 20 minutes, or until the lentils are tender. Drain the lentils in a colander and rinse briefly with cool water until they are cooled. Note: there are many ways to cook lentils, I just find this to be the easiest and most foolproof. 
 
While the lentils are cooking, prepare the lemon garlic dressing. In a small bowl, whisk together the lemon juice, olive oil, minced garlic, oregano, salt, and pepper. Set the dressing aside.
 
When the lentils are cooked, cooled, and well drained, transfer them to a large bowl. Add the chopped parsley or mint, tomatoes, onion, cucumber, crumbled feta, and the prepared dressing. Stir to combine the ingredients and coat everything in dressing.  Taste and adjust seasonings to your preference.
 
Let sit 20 minutes, to allow the flavors to meld, or refrigerate until ready to eat. Always stir the salad just before serving to redistribute the dressing and flavors.
 
 
To your health,
 
Teri
4 Comments

Cooking in the time of Covid

4/13/2020

0 Comments

 
​Greetings to all my fabulous students!
I hope this post finds you and your families healthy… a little restless, I'm sure, but hopefully healthy too! J  I terribly miss teaching my cooking classes, but thought that I would share a little recipe to help get you through these crazy times. 
These are “Energy Balls": a nutritious, guilt-free snack that's perfect before a workout, as a light breakfast, or even for those moments when you're sitting on the couch wondering whether you're hungry or just bored (just me?). They're easy to make (no baking involved!), easy to personalize (substitutions are expected!), great for your digestion, and will really fill you up!
Enjoy the recipe, and feel free to let me know how you personalized it. I look forward to cooking with you soon!
 
Energy Balls
  • 3/4 cup Peanut Butter, Almond Butter or Tahini (Sesame Seed Butter)
  • 1-2 tablespoon Honey, Agave or Maple Syrup
  • 1 teaspoon Vanilla
  • 1-3 tablespoons Chia Seeds and/or Flax Seeds
  • 3/4 cup uncooked Old Fashioned Oats (note: you can use “Quick Oats”, but the balls will have a slightly softer texture)
Optional add-ins: 1/4 cup Mini Chocolate Chips, Chopped Almonds or Walnuts, Raisins or Other Chopped Dried Fruit, Pumpkin Seeds, Protein Powder, and/or a little Cinnamon
1.  Place the nut butter, honey and vanilla in a microwavable bowl and microwave the ingredients for 20 seconds.
2.  Stir the mixture until well combined, then add in the remaining ingredients (and any extra add-ins).
3.  Stir well and make sure there are no dry ingredients left on sides of bowl (it helps to rotate the bowl while mixing).  Refrigerate mixture for at least 30 minutes to allow it to firm up.
4.  Using a large cookie scoop or spoon, scoop out 10-12 balls and roll with your hands to create a rounder shape.  Lightly wet your hands if the mixture is too sticky.
5.  Store Energy Balls in an airtight container in the fridge for up to two weeks.
 
Be well,
Teri
0 Comments

    Hello there!  I'm Teri, the owner of Eatsies, a small, hands-on cooking school in La Jolla Ca.  

    I admit, I'm not much of a writer (I'd much rather be teaching people how to cook...in person), but with time on my hands during this crazy Covid epidemic, I decided to send out a little newsletter.  It was pretty successful, and I've had requests to post it on my website.  So, here you go!

    Archives

    September 2020
    August 2020
    July 2020
    June 2020
    May 2020
    April 2020

    Categories

    All

    RSS Feed

Powered by Create your own unique website with customizable templates.