EATSIES
  • About
  • Class Calendar
  • Photos
  • Sample Classes
  • Upcoming Classes
  • Reviews and Comments
  • Contact
  • Blog
  • Online Kid's Cooking
EATSIES

Do you Salsa?

7/20/2020

0 Comments

 
Hello fellow quarantiners!

I miss you all, and I hope you’re doing well. While more time has passed and it seems like we won’t be returning to normal any time soon, it is still summer, and anywhere you're quarantined is a great place for a cold drink, a bowl of chips, and some fresh homemade salsa. Eatsies to the rescue! For this week's recipe, I wanted to pass along my absolute favorite, super-easy Salsa Verde.  This recipe is (almost) simple enough to make with your eyes closed, and it’s so versatile, you’ll want to keep a batch in your fridge all summer!  Besides serving it with chips, it’s terrific on tacos, as a topping for chicken or pork chops, or as the sauce for some absolutely delicious Enchiladas Verdes.  Even better news: you have the ability to make this salsa as spicy or as mild as you choose just by varying the type and/or amount of peppers you use.  So what are you waiting for?  Let’s get cookin'! J
 
Salsa Verde
8 tomatillos (about 1 lb.), husked, stemmed and rinsed
2 large onions, peeled and cut into quarters
2 large poblano peppers
Optional, for extra heat: 1 small hot pepper (jalapenos and serranos work great here, or even a habanero if you can't get enough heat!)
2 large cloves garlic, peeled
1 large handful cilantro, stems and all, well rinsed
1 teaspoon cumin
1 teaspoon salt
1 tablespoon lime juice (about ½ of a medium lime)
 
  • Preheat oven to 430°.
  • Place tomatillos, onions, peppers and garlic on a large rimmed baking sheet.  Roast in oven for 20 minutes, or until beginning to brown and tomatillos are soft.
  • Remove stems and any loose skin from peppers, and place them, along with the tomatillos, onions, garlic and any juice from baking sheet into a blender or food processor.
  • Add remaining ingredients and blend to desired consistency.  Some people prefer this very smooth and some prefer a chunkier texture. 
  • Adjust seasoning with more salt or lime juice to taste.
  • Eat right away, or store (covered) in the refrigerator for up to 1 week.
Since there are so many ways to use this salsa, I’d love to hear your ideas.  Email me and let me know how you use it - bonus points if you send a picture I can feature on the Eatsies Instagram! 

As always, I hope you’re staying sane and healthy.  I look forward to teaching again one day soon!

All my best,

Teri
0 Comments

It's tool time!

7/5/2020

0 Comments

 
Hello friends, 
 
How’s the quarantine treating you? I was getting so excited, thinking I’d be able to start teaching again soon, but after California’s recent numbers, my optimism is beginning to wane. :( In the meantime, though, here’s another little newsletter with (hopefully) some helpful tidbits that might make your cooking adventures a bit more relaxing.  And if you’ve missed any of my quarantine letters, please take a look at my website, where I just got around to posting them!  And (fingers crossed…) be on the lookout for my email announcing my return to teaching! As much as we’d all like to forget quarantine at this point, I’m putting together a class sharing my favorite dishes from the past few months that I think you’ll love.  My biggest goal during this time was to come up with a recipe for the ultimate veggie burger... and I THINK I’VE DONE IT!!
 
Without further ado, here are your tips for today, in the form of a few kitchen tools that every cook should own. Now, I’m not normally a “gadget” person.  My kitchen is already crowded, so for me to really like a gadget, it has to be: 
  1.     A multi tasker 
  2.     Small 
  3.     Something that gets a job done easily and saves me time
 
And the winners are...
 
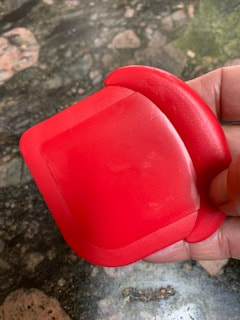
Plastic bowl/pan/counter scraper:  These little thingies can be found for under a dollar at your nearest hardware or home store and they are truly a lifesaver.  Because they’re plastic, they won’t scratch the surface of whatever you need to clean and they really do the job.  Rock hard, burnt on spills on your stove, counters or pans will come off easily.  I use these on my granite counters and All Clad pans with no problems at all.  Keep one by your sink.  
 
 
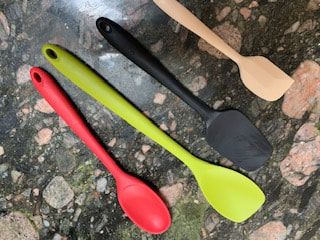
​Silicone spoons, spatulas and “spoonulas”:  these are the BEST!  They won’t melt on the stove, and they’re great for stirring, mixing, and scraping that last drop from your bowls.  And the little ones are perfect for getting that last bite of peanut butter out of the jar. :)  My fave part of these is that they’re made in one piece. Sound unimportant?  Then you’ve never had the handle of a spatula come off and been forced to take a look at the gunk that gets trapped inside!  Yuuuuck! You can find these everywhere, especially TJMaxx or Homegoods.
 
 
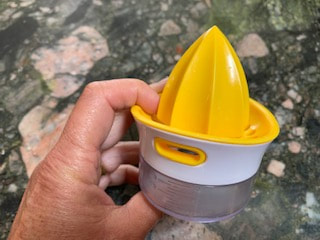
​Mini Citrus Juicer:  This little baby will get you every last drop of juice and is really easy to use and to wash.  And it has measurements on the side so you know just how much juice you’ve squeezed.  I’ve found them at Homegoods for about $3.  At that price, buy 2!


And lastly, if you’ve taken one of my classes, you may have met my favorite Can Opener.  I don’t even know the name of this style (there are several different companies that make these), but the key is that they roll the top edges of the can so that you don’t end up with any sharp edges.  Also, the can opener never actually comes in contact with the can’s contents, so you don’t end up with rusty blades or icky black buildup! Be sure to look for the kind described as “safe cut” or “smooth edge”.
 
 
Finally, it wouldn’t be an Eatsies letter without including a quick little recipe that’s sure to make your mouth happy! Today’s is for the summer cocktail drinkers, lemonade stand-ers, and fruit lovers everywhere: Simple Syrup!!  Sure, you can buy this everywhere, but it is definitely one of those recipes that you should be making from scratch.  It is soooo easy to make, costs a fraction of what it would cost pre-made, and will last in your fridge for months!  And you can use it in so many ways: as a sweetener for lemonade or your favorite “adult” drinks; poured over cut fruit to sweeten a fruit salad; or even added to pureed fruit, then frozen to make a sorbet.  And to make it extra special, see notes below for different ways to flavor it!  
 
Homemade Simple Syrup
 
1 Cup white granulated sugar
1 Cup water
 
Place both ingredients in a medium pot over high heat, and stir to dissolve sugar.  Bring to a boil, then turn the heat down to low.  Let contents simmer for about 20 minutes, or until it becomes slightly thick, like a syrup.  Remove from stove and let cool (it will thicken a bit more as it cools).  Can be stored, covered, in the fridge for months.  Or put some in a pretty bottle to give as a gift!
 
Note: For a delicious flavored syrup, add your favorite herbs, spices, or fruit (like a handful of fresh mint or basil, a small cinnamon stick, a vanilla bean, or the peel of a lemon, orange, or lime) after bringing the syrup to a boil.  Let simmer, then strain out before using or storing. 
 
Happy cooking, happy eating, and I do hope to see you soon!
 
Stay healthy, 

Teri
0 Comments

    Hello there!  I'm Teri, the owner of Eatsies, a small, hands-on cooking school in La Jolla Ca.  

    I admit, I'm not much of a writer (I'd much rather be teaching people how to cook...in person), but with time on my hands during this crazy Covid epidemic, I decided to send out a little newsletter.  It was pretty successful, and I've had requests to post it on my website.  So, here you go!

    Archives

    September 2020
    August 2020
    July 2020
    June 2020
    May 2020
    April 2020

    Categories

    All

    RSS Feed

Powered by Create your own unique website with customizable templates.